Electric Dirt Bike Upgrade Guide: What to Change First on a Soleil 01 or In 10
Electric dirt bike upgrades work best in order: brakes first for safety, then the motor for climbing power, then hardware and lighting. See the full build sequence for a standard Soleil 01 or In 10.
Why Electric Dirt Bike Upgrades Should Start With Brakes
- Why Electric Dirt Bike Upgrades Should Start With Brakes
- Step 2: Motor Upgrades for Climbing Power
- How to Choose Upgrades for Your Riding Style
- Build-Order Comparison: Brakes, Motor, Hardware and Lighting
- Step 3: Hardware and Protection Upgrades
- Step 4: Lighting and Comfort Upgrades
- How to Install Electric Dirt Bike Upgrades Safely
- Common Upgrade Mistakes to Avoid
- Alternatives and Next Steps
Electric dirt bike upgrades work best in a fixed sequence: brakes first for safety, then the motor for climbing power, then hardware and protection, then lighting and comfort. This build order applies directly to the Tuttio Soleil 01 and Yozma In 10 platforms.
Soleil Supplies is used throughout as a worked example, since its catalog covers both platforms end to end (see our full Soleil Supplies review for the complete parts breakdown). This guide focuses on sequencing and fitment, not brand selection.
Upgrade brakes first, then the motor, then hardware and lighting, in that order
If you only have time or budget for one upgrade this season, do the brake kit. Everything else on this list adds power, protection, or comfort, but stopping power is the one upgrade that changes the risk profile of every ride after it.
Check current priceKey Highlights
- Brakes come first: stopping-power upgrades should land before any power upgrade, not after.
- The motor upgrade only makes sense once your brakes can handle the added torque.
- Hardware and protection upgrades (foot locks, motor cover, side panels) protect the investment you just made.
- Lighting and comfort come last: they matter, but they don't change how safely the bike rides.
- All parts referenced here fit the standard Tuttio Soleil 01 and Yozma In 10, not confirmed Pro variants.
Why Electric Dirt Bike Upgrades Should Start With Brakes
Electric dirt bike upgrades should start with brakes because stopping power has to match whatever power comes next, not the other way around. Riders who add motor torque before upgrading brakes are riding a faster bike with the same stock stopping capacity.
The Ultra Bee Rear Brake Kit pairs an OEM-style Ultra Bee brake assembly with a precision-fit Tuttio mounting bracket, and it is fully compatible with the standard Tuttio Soleil 01 and Yozma In-10 models, not the Pro variants. The kit ships pre-bled, so there is no air-bleed step at install, and an optional rotor guard is available separately for riders who want extra protection against rock strikes on the trail.

A matching front kit exists, and both are available in chrome or glossy black finish so the upgrade doesn't clash with the rest of the bike. Once the calipers and brackets are sorted, the pad compound is the next lever. Tuttio Soleil 01 performance brake pads use a copper-infused compound built for better initial bite and more progressive modulation than stock pads, with copper blends chosen for their heat dissipation under repeated braking. That combination, an OEM-style caliper plus a copper-infused pad, is the standard formula for improving stopping feel without changing the rotor size.

Ultra Bee Front and Rear Brake Kits
What We Like
- Pre-bled brake lines remove the messiest part of a brake install
- Matched OEM-style caliper and bracket, not a generic universal fit
- Optional rotor guard for trail debris protection
What to Consider
- Confirmed for standard models only, no stated Pro-variant fitment
- No published stopping-distance data, so treat gains as functional, not measured
Because this stage changes the bike's actual stopping capability, it belongs first in the build order regardless of which motor or hardware upgrades come after it.

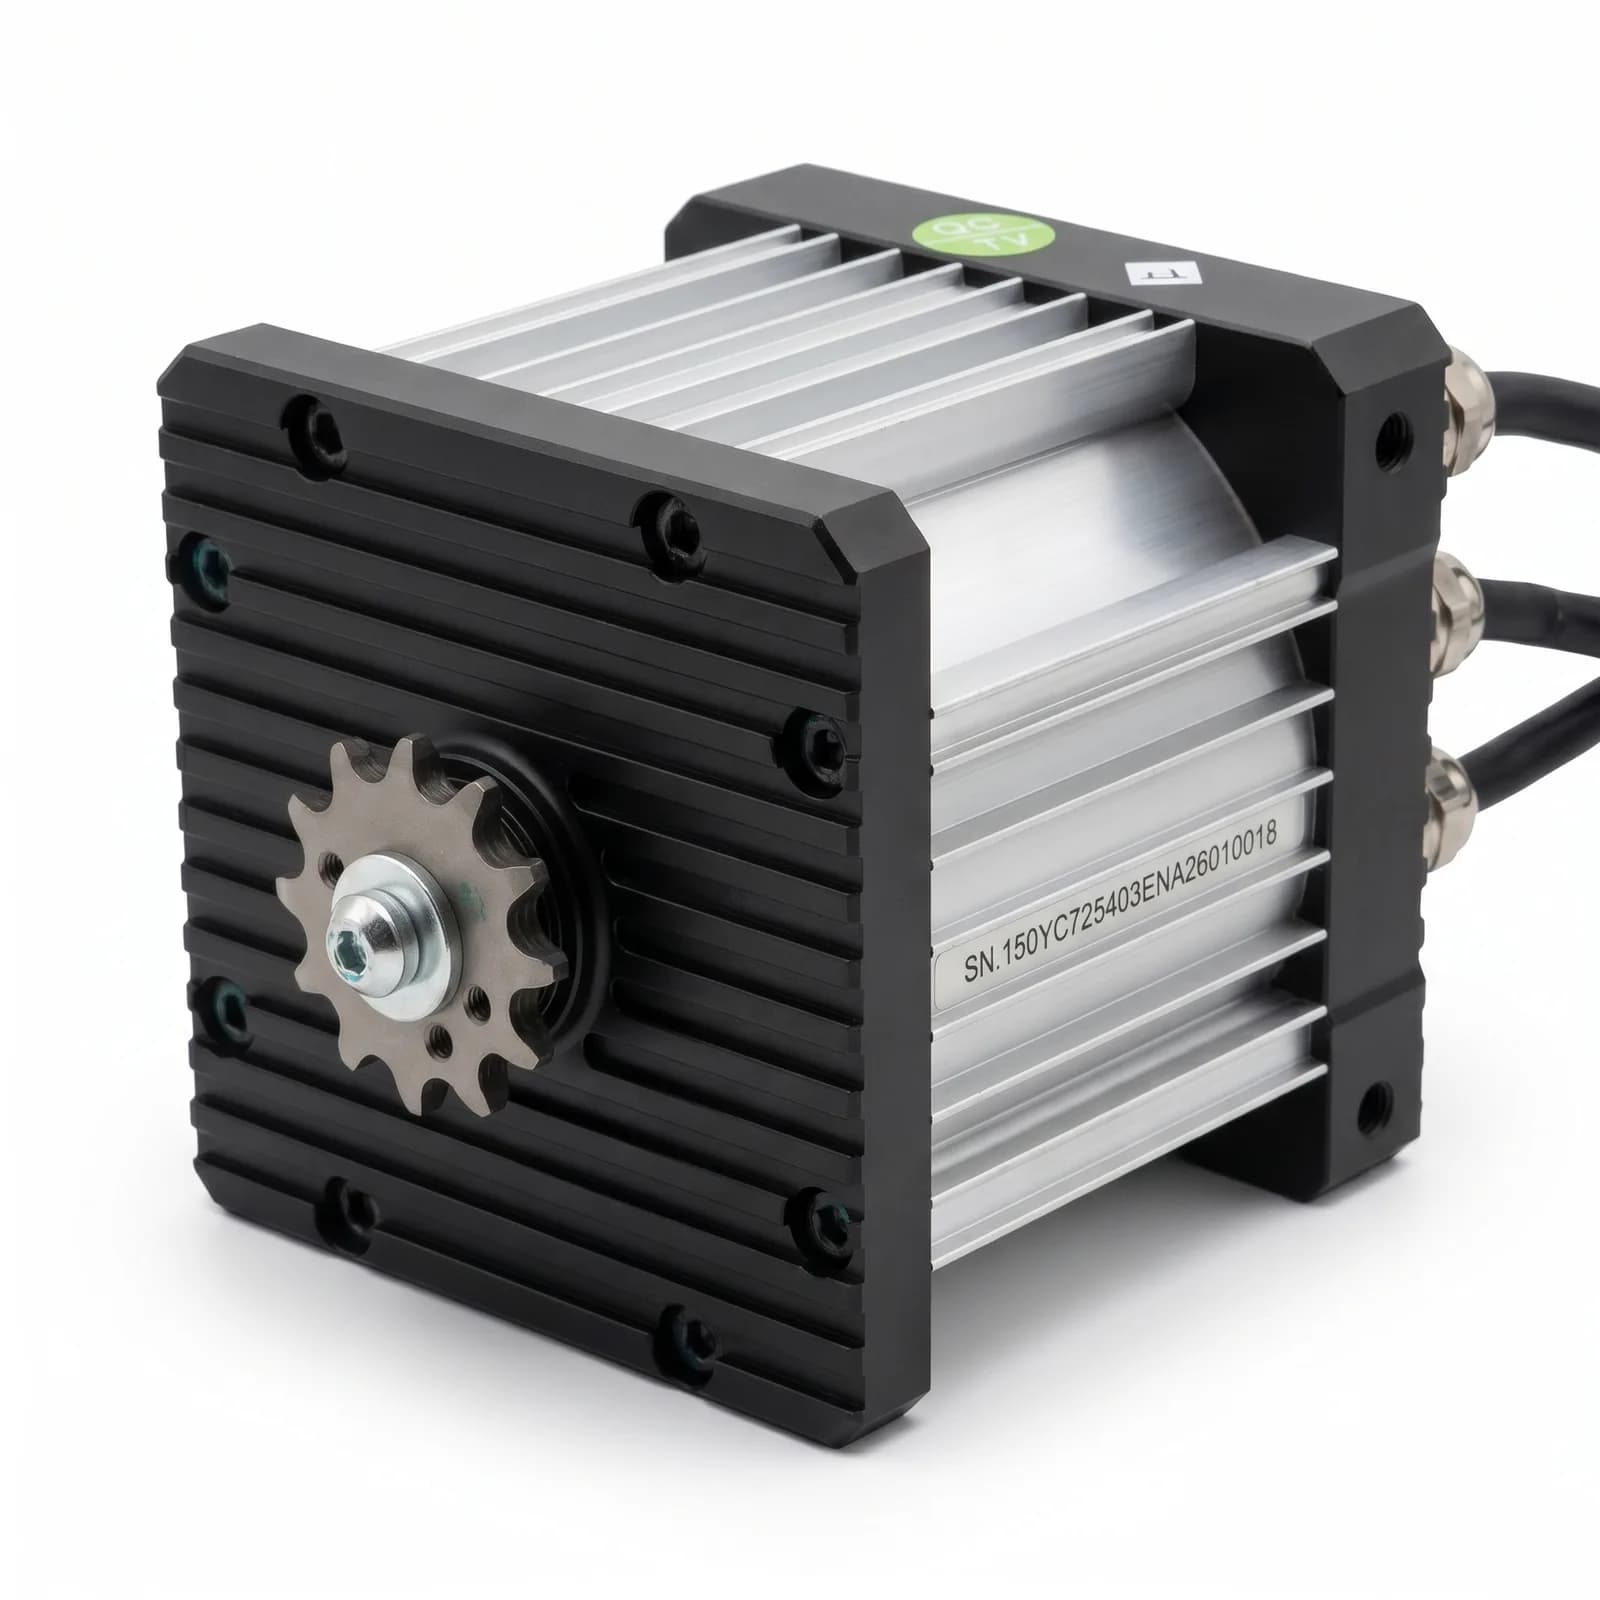
SOTION FW23 72V Mid-Drive Motor
A mid-drive unit that routes power through the bike's existing drivetrain rather than bypassing it, which is why it pairs well with an already-upgraded brake system.
Check current priceStep 2: Motor Upgrades for Climbing Power
Once brakes are upgraded, motor power is the next stage in the build order because it is the change that most directly affects climbing and acceleration. The Tuttio Soleil 01 SOTION FW23 72V mid-drive motor is rated for 8KW continuous output with 16KW peak power, and it operates up to 10,000 RPM with encoder feedback for smoother torque modulation.
The mid-drive positioning matters for fitment reasoning, not just power. Direct mid-drive engagement means motor power applies through the bike's existing drivetrain, unlike hub motors which bypass gearing entirely, and gear-assisted torque multiplication is what makes steep climbing and technical terrain manageable. The unit uses a splined shaft compatible with a 420 12T sprocket, and carries an IP67 waterproof rating for weather resistance on wet trails.

This is the point where the fitment caveat matters most: the brand publishes fitment for the standard Soleil 01 and In 10, and does not publish a year-by-year compatibility matrix. If your bike is a Pro variant, a different model year, or has already been modified, confirm the sprocket and mounting dimensions before ordering rather than assuming a drop-in fit.
How to Choose Upgrades for Your Riding Style
The build order above is the default path, but which stage matters most depends on how you actually ride. Match your situation below before spending on the next stage.
- Weekend trail rider on rough terrain: brakes and hardware protection (motor cover, side panels) matter more than raw power. Rock strikes and drops are the bigger risk than a slow climb.
- Rider adding steep climbs or technical terrain: the mid-drive motor upgrade is the priority once brakes are handled, since gear-assisted torque is what gets you up a grade a hub motor struggles with.
- Multi-hour or low-light rider: move the lighting kit and seat cover up the list. A self-powered light kit and a high-grip seat cover matter more to you than an extra side panel.
- Rider who carries tools or spares: a metal storage compartment solves a real problem (no backpack) before it becomes a comfort upgrade rather than a functional one.
Build-Order Comparison: Brakes, Motor, Hardware and Lighting
Use this table to see what changes at each stage and who should prioritize it.
| Upgrade stage | What it changes | Best for | Fitment note |
|---|---|---|---|
| 1. Brakes (Ultra Bee front/rear kits + pads) | Stopping power and pad modulation | Every rider, before any power upgrade | Standard Soleil 01 / In 10 only |
| 2. Motor (SOTION FW23 72V mid-drive) | Climbing torque and top-end power | Riders adding hill climbs or technical terrain | Mid-drive uses existing drivetrain; confirm sprocket fit |
| 3. Hardware and protection (foot locks, motor cover, side panels, subframe cover) | Foot security and impact protection | Riders logging regular trail miles | Bolt-on, no frame modification per brand's install philosophy |
| 4. Lighting and comfort (Baja light kit, seat cover, storage) | Visibility and long-ride comfort | Low-light or multi-hour riders | Battery-powered light kit; seat cover needs staple-gun install |
Step 3: Hardware and Protection Upgrades
With brakes and motor handled, hardware upgrades protect the bike and the rider without changing performance. The Tuttio Soleil 01 foot lock is a CNC-machined aluminum component with a swept-arm design that positions the peg further back and higher than stock, giving a firmer foot stop during acceleration or aggressive riding. The Yozma In 10 version uses the same CNC-machined approach with an added knurled grip surface for traction even when wet or muddy, and it is listed as a left-side mount only rather than a pair.

Protecting the motor is the other half of this stage. The Yozma In 10 metal motor cover is built from solid metal rather than plastic, shielding the motor housing from rock strikes, brush contact and accidental impacts, which extends motor lifespan by preventing puncture and corrosion.

Cosmetic hardware fits at this stage too, since it uses the same bolt-on philosophy. Tuttio Soleil 01 side panels are available in ABS plastic, carbon-fiber-appearance, and real carbon fiber grades, all mounting directly with existing hardware; the real carbon fiber option also reduces weight, not just appearance. A matching subframe cover replaces the stock bare subframe tube with a cleaner triangle panel, also installing without frame modification.

Every hardware upgrade in this stage follows the same install logic. Soleil Supplies designs its brake kits, lighting kits and hardware upgrades around a bolt-on, plug-and-play philosophy, mounting to existing frame attachment points so riders without specialized tools can install them without welding, electrical integration or custom fabrication.
Step 4: Lighting and Comfort Upgrades
Lighting and comfort come last because they don't change how the bike stops, climbs or holds up to impact, they change how long and how comfortably you can ride it. The Yozma Baja Light Kit uses dual high-output LED light pods that are fully self-powered by a battery pack, requiring no connection to the bike's electrical system and no permanent wiring integration.

For comfort, the Yozma Thrill Seekers seat cover uses a high-grip textured surface pre-cut for the In 10 and Strike Shadow platforms, installed with a staple-gun rather than adhesive, and maintains traction even when wet or muddy. A metal storage compartment adds weatherproof, secure space for keys, tools or spare parts, mounting to the frame without permanent modification, which matters if you ride without a backpack.
How to Install Electric Dirt Bike Upgrades Safely
Follow the sequence in order rather than jumping to whichever part looks most exciting.
- Confirm your exact model (standard Soleil 01 or In 10, not a Pro variant) before ordering any part, since the brand does not publish year-by-year fitment.
- Install the brake kit first: mount the caliper and bracket, connect the pre-bled line, and bed in the copper-infused pads before riding hard.
- Add the motor upgrade only after brakes are confirmed working, checking sprocket compatibility with the splined shaft before final assembly.
- Fit hardware and protection (foot locks, motor cover, side panels) using existing frame attachment points, no welding or modification.
- Finish with lighting and comfort upgrades, since these are independent of the drivetrain and brake work.
- Re-check every bolted connection after the first ride, since new hardware settles once it takes real trail impact.
Common Upgrade Mistakes to Avoid
- Upgrading the motor before the brakes. More power without matching stopping capacity is the single most common sequencing mistake.
- Assuming Pro-variant fitment. Parts here are stated for standard Soleil 01 / In 10 models; the brand does not publish a Pro-variant or year-by-year compatibility matrix.
- Skipping the sprocket check. The mid-drive motor's splined shaft is built for a 420 12T sprocket, confirm your bike matches before ordering.
- Treating cosmetic panels as structural. Side panels and subframe covers improve appearance and, for real carbon fiber, weight, but they are not protective armor the way a motor cover is.
- Wiring a lighting kit into the bike's electrical system. The Baja Light Kit is designed to run on its own battery pack specifically to avoid that step.
Alternatives and Next Steps
Some of these components are not limited to the Soleil 01 and In 10. Many parts in this catalog are designed with cross-compatibility across multiple electric dirt bike platforms, with additional fitments available for Sur-Ron, Talaria and Strike Shadow models alongside the two primary platforms, so riders on adjacent bikes have a similar upgrade path available.
If you're still deciding whether Soleil Supplies is the right source for these parts at all, rather than just the order to buy them in, read the full Soleil Supplies review for the complete catalog breakdown, fitment notes and finish options across every part line.
The Verdict: Brakes, Then Motor, Then Everything Else
For a standard Tuttio Soleil 01 or Yozma In 10, the safest and most logical build order is brakes first, motor second, hardware and protection third, and lighting and comfort last. Confirm your exact model before ordering, since fitment is stated for standard models only.
Check current priceSources
- Soleil Supplies, About page — install philosophy and cross-platform fitment.
- Soleil Supplies, full product catalog feed — brake, motor, hardware and lighting specifications.
This guide is based on manufacturer-published specifications and fitment notes, not hands-on installation testing. Electrical and mechanical upgrades to an electric dirt bike carry real safety risk if installed incorrectly. If you are not confident with brake bleeding, motor mounting or electrical work, have the installation checked by a qualified mechanic before riding.
More E-Bikes & Scooters guides
 Revibikes Models Compared: 5 Best Picks by Rider Type (2026)
 Varstrom E-Bike Conversion Battery: Voltage & Capacity Guide (2026)
 Asiwo MAKO Review 2026: Best Entry-Level Sea Scooter?
 Soleil Supplies Review 2026: Best Tuttio & Yozma Upgrade Parts
 KuKirin Electric Scooters: Safe Buyer's Guide to All 14 Models (2026)
 ONESPORT Ebike Review 2026: 8 Models Compared, Best Picks